
📑 Table of Contents ▶
- Red Velvet Cake Pops: A Celebration of Flavour
- Fundamentals
- Preparation/setup
- Directions
- Mastering the Art of Red Velvet Cake Pops
- Technique
- Tips/tricks
- Perfecting Your Red Velvet Cake Pops
- Perfecting results
- Troubleshooting/variations
- Serving Your Red Velvet Cake Pops
- Serving/presentation
- Pairings/storage
- Ingredients
- Method
Red Velvet Cake Pops
Welcome to Eatimi! I’m Olivia Hart — a home-cook who believes delicious food doesn’t need complicated techniques. Here I share easy everyday recipes, family meals, quick ideas for busy days and helpful kitchen tips to make cooking simple and fun. My goal is to help you feel confident in the kitchen and enjoy homemade food with joy, comfort and love. 💛
Red velvet cake pops hold a special place in my heart. I remember the first time I made them for a family gathering. Everyone adored their vibrant colour and delightful taste. Watching everyone enjoy these bites of joy made me realise how certain recipes can unite people.
The combination of rich chocolatey goodness with cream cheese frosting wrapped in a delicious chocolate coating transports you to a blissful place. Red velvet cake pops are not only perfect for celebrations but also make for a sweet treat on a regular day.
Creating them involves a bit of baking and crafting, but the result is so worth it.
Red Velvet Cake Pops: A Celebration of Flavour
Fundamentals
To start, understanding the core components of red velvet cake pops is essential. Each element plays a crucial role in achieving the perfect texture and taste. The classic mixture of cocoa powder and vibrant food coloring creates that signature red hue. The buttermilk adds a hint of tanginess, beautifully balancing the sweetness.
With these cake pops, you’ll capture the attention of anyone who takes a bite. The silky cream cheese frosting blends perfectly into the cake, allowing for delightful bites that burst with flavour.
Ensure you have all the tools ready before you start. Using a mixing bowl, spatula, and a baking pan makes the process seamless.
Preparation/setup
Preparation is key to executing your red velvet cake pops flawlessly. Begin by preheating the oven to 350°F (175°C). Greasing and flouring the baking pan will prevent sticking and ensure easy removal.
The right temperature guarantees even baking, allowing the cake to rise beautifully. Accurate measurements make a significant difference, especially since red velvet cake relies on a specific balance of ingredients for perfection.
You’ll want to set up your mixing area. Gathering all ingredients upfront saves you time and keeps the process flowing smoothly.
Ingredients
To craft these delightful treats, gather the following ingredients:
- 1 ½ cups all-purpose flour
- 1 cup granulated sugar
- ½ cup unsweetened cocoa powder
- 1 teaspoon baking soda
- 1 teaspoon salt
- 1 cup vegetable oil
- 1 cup buttermilk
- 2 large eggs
- 2 tablespoons red food coloring
- 1 teaspoon vanilla extract
- 1 cup cream cheese frosting
- 12 ounces chocolate melts
These ingredients combine to create that irresistible taste that makes red velvet cake pops a favorite.
Directions
- Preheat the oven to 350°F (175°C). Grease and flour a 9×13 inch baking pan.
- In a mixing bowl, blend together flour, sugar, cocoa powder, baking soda, and salt until combined.
- Pour in the vegetable oil, buttermilk, eggs, red food coloring, and vanilla extract. Mix until the batter appears smooth.
- Pour the batter into the prepared pan and bake for 30–35 minutes or until a toothpick comes out clean from the centre.
- Allow the cake to cool completely before crumbling it into a large bowl.
- Mix in the cream cheese frosting until the mixture holds together.
- Scoop out the mixture and roll it into balls, then place them on a tray.
- Freeze the balls for about 30 minutes to help them firm up.
- Meanwhile, melt the chocolate melts in a microwave-safe bowl, stirring every 30 seconds until smooth.
- Dip the tip of each lollipop stick into melted chocolate, insert it into a cake ball, and let it set for a few minutes.
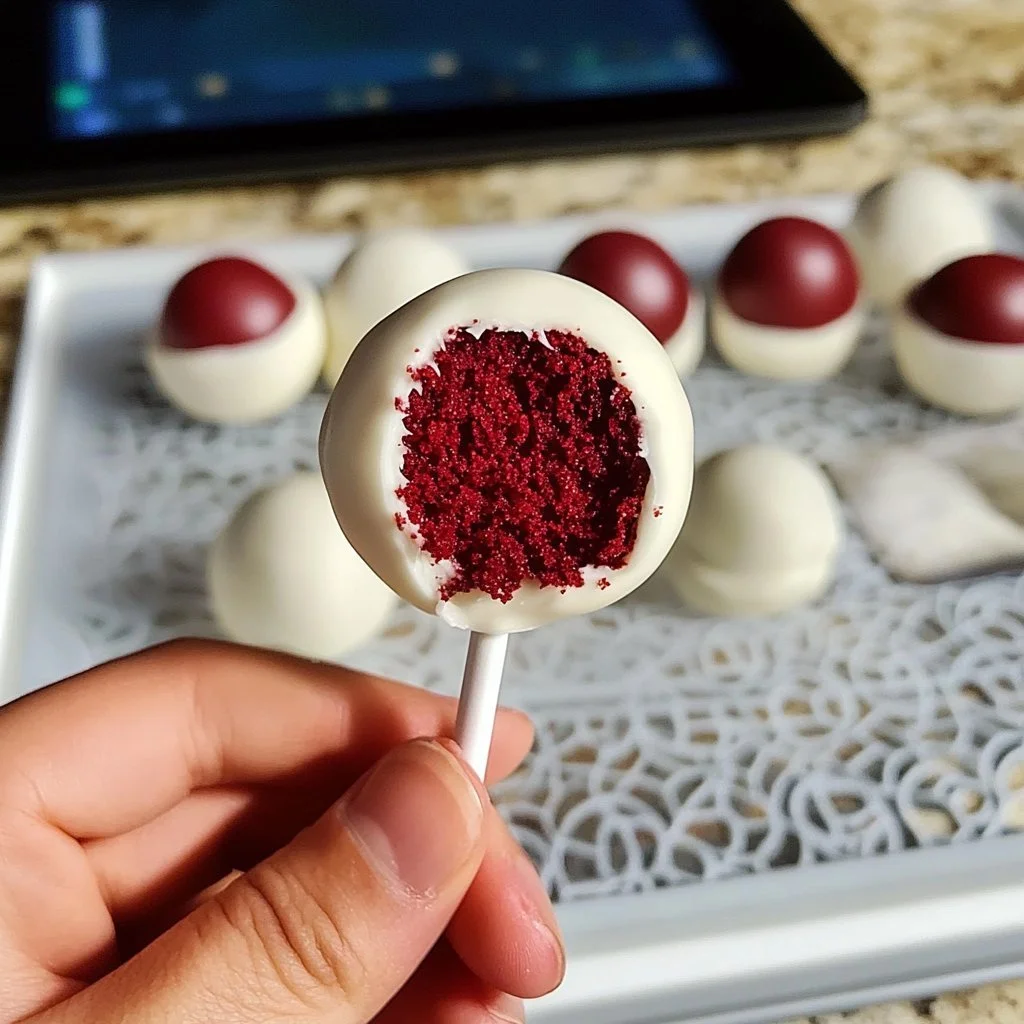
- Once set, dip the cake pops into the chocolate until fully coated, then place them back on the tray.
- Allow them to set completely before serving.
Mastering the Art of Red Velvet Cake Pops
Technique
Creating cake pops involves a few specific techniques that ensure you achieve the desired consistency and flavour. Rolling the mixture into even-sized balls makes a difference in cooking and presentation. Keep the cake balls uniform for a polished look.
Freezing the balls is essential. This step firms them up, making it easier to dip into the melted chocolate without losing shape.
When melting the chocolate, take care not to overheat it. Stirring every 30 seconds keeps the chocolate smooth and prevents burning.
Tips/tricks
A few tips can enhance your red velvet cake pops. Use high-quality cocoa powder for a richer flavour. Ensure you mix your batter thoroughly, eliminating lumps for a smooth texture.
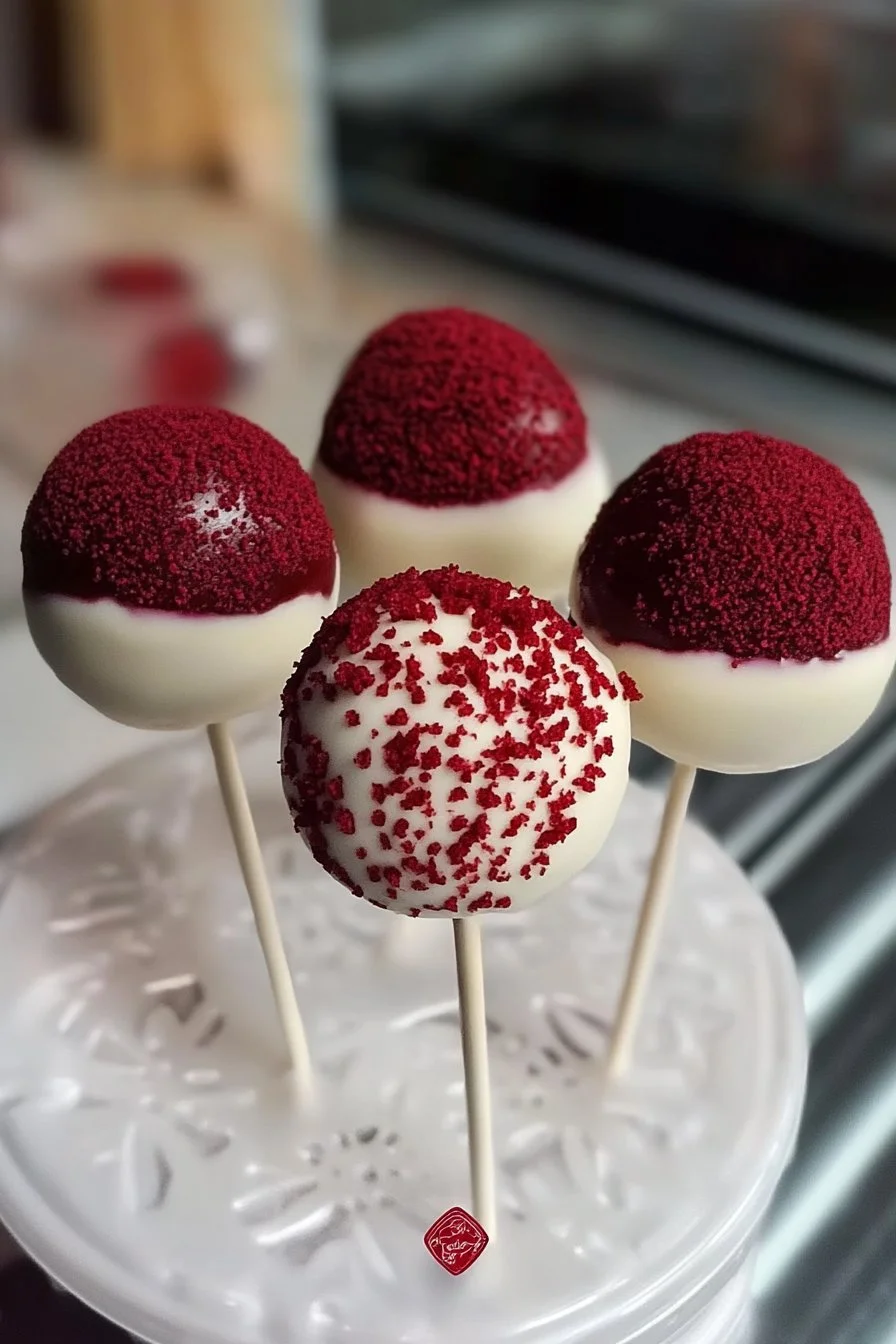
Experiment with fun decorations! You might sprinkle some colourful sprinkles on top right after dipping the pops, adding a festive touch.
For an extra touch of elegance, drizzle some contrasting chocolate over the pops after coating them.
Perfecting Your Red Velvet Cake Pops
Perfecting results
To ensure your cake pops are a success, follow the baking instructions closely. Check for doneness by inserting a toothpick—if it comes out clean, your cake is ready.
After crumbling the cooled cake, incorporate the cream cheese frosting carefully. You want a texture that holds together without being overly moist.
Size matters, so aim to make all cake balls the same size. This ensures even coating and consistent cooking.
Troubleshooting/variations
Sometimes, things don’t go as planned. If your cake pops crumble, it could be due to insufficient frosting. Add a touch more frosting until the mixture holds together effectively.
If you find your chocolate coating isn’t smooth, consider adding a teaspoon of vegetable oil to the melted chocolate. This can help achieve a thinner, glossier coating.
Feel free to experiment with various cake flavours too! While red velvet is always a classic choice, trying other playful flavours can be a great way to mix things up.
Serving Your Red Velvet Cake Pops
Serving/presentation
Presentation can elevate your red velvet cake pops from good to spectacular. You can serve them in pretty cupcakes liners or stick them in a stylish floral foam base for an attractive display.
They make excellent centrepieces at parties. Guests will be drawn to their colour and will love the bite-sized convenience.
Pairings/storage
While red velvet cake pops shine on their own, consider pairing them with a side of fresh fruit for a balanced dessert. Berries complement the chocolate beautifully and add a refreshing touch.
Store your cake pops in the refrigerator to maintain freshness. A well-sealed container will keep them moist for several days.
Alternatively, you could freeze them for longer storage. This way, you’ll always have a sweet treat on hand.
My journey with red velvet cake pops doesn’t end here. Crafting these playful desserts brings joy to both the maker and the enjoyers. Consistently proving they’re not just a delicious treat, but an experience worth sharing!
Red Velvet Cake Pops
Ingredients
Method
- Preheat the oven to 350°F (175°C). Grease and flour a 9x13 inch baking pan.
- In a mixing bowl, blend together flour, sugar, cocoa powder, baking soda, and salt until combined.
- Pour in the vegetable oil, buttermilk, eggs, red food coloring, and vanilla extract. Mix until the batter appears smooth.
- Pour the batter into the prepared pan and bake for 30–35 minutes or until a toothpick comes out clean from the center.
- Allow the cake to cool completely before crumbling it into a large bowl.
- Mix in the cream cheese frosting until the mixture holds together.
- Scoop out the mixture and roll it into balls, then place them on a tray.
- Freeze the balls for about 30 minutes to help them firm up.
- Meanwhile, melt the chocolate melts in a microwave-safe bowl, stirring every 30 seconds until smooth.
- Dip the tip of each lollipop stick into melted chocolate, insert it into a cake ball, and let it set for a few minutes.
- Once set, dip the cake pops into the chocolate until fully coated, then place them back on the tray.
- Allow them to set completely before serving.